
In this article
- DRINKS Assure Embeds
- DRINKS Assure Blocks
- DRINKS Assure Compliance Features
- DRINKS Assure Tax Service
- ShipCompliant Integration
Congratulations on partnering with DRINKS! Your business is now one (big) step closer to creating seamless commerce experiences for your customers.
There are three steps to get started with DRINKS Assure real-time tax and compliance on Shopify:
- Step 1: Configure DRINKS Assure
- Step 2: Activate DRINKS Assure Embeds
- Step 3: Enable DRINKS Assure Tax Service
Introduction
This guide provides step-by-step instructions for configuring DRINKS Assure on your Shopify Plus store. Please note that there are two roles/skillsets needed to get up and running:
- Alcohol compliance
- Shopify front-end developer
Setting up compliance information requires your business's license and product information. DRINKS Assure provides compliance defaults for each state that will facilitate tight compliance, but plan to review all settings carefully to make sure they match how you are doing business today. If you have questions on what values to choose or how to configure the app to meet your needs, please contact us. We're happy to help you set up DRINKS to ensure it meets your needs.
Configuring DRINKS Assure on your Shopify Plus store requires modifying front-end Liquid code. This is what allows DRINKS Assure to seamlessly prompt shoppers for their age and shipping location, restrict non-compliant products from being added to the cart, display state-specific warnings in checkout, and more. If you need help with installation, please contact us and we can walk you through the setup or provide a reference to a Shopify agency that can integrate DRINKS Assure into your store.
Before you begin,
Install DRINKS Assure on your Shopify Store
- Navigate to DRINKS Assure in the Shopify App Store
- Click the Add app button and follow the prompts
Step 1: Configure DRINKS Assure
Configure Online Store
Overview:
These settings impact how your customers will interact and experience your site from a compliance perspective.
Settings:
Navigate to the Online Store tab.

Site Interaction

- Display the age modal – upon site entry, do you want customers to be asked if they are 21? How often would you like the age modal to users? (this setting is deprecated, but not yet removed. Control is now handled through the app block theme setting.)
- Display the 'shipping to state' dropdown selector – Upon site entry, do you want customers to be asked which state they are shipping to? This also allows a customer to change their shipping state anywhere on the site (in the header as a drop-down)
- Collect Date of Birth (DOB) during account setup – decide if you want to ask customers to enter their DOB at account setup
- Collect Date of Birth (DOB) during checkout – decide if you want to ask customers to enter their DOB during checkout (this setting is deprecated, but not yet removed. Control is now handled through the app block theme setting.)
Note: some of these settings are now handled via App Extensions (Step 2 below) - display age model, shipping to state dropdown and collecting DOB during checkout.

Age Prompt Site Entry - This allows you to customize the age modal messaging that users see when entering your store. The listed defaults will display, if no changes are made. This can also be handled in Step 2 below.
Checkout Errors - You can customize the messaging for each potential compliance error message a user could see at checkout. If no changes are made, the defaults created by DRINKS Compliance team will be displayed.
Configure License Information
Overview:
This will allow you to enter all your license entities for state reporting purposes.
Settings:
Navigate to the License Information tab.

Configuring License Entities
Add all TTB licenses for your business

The following information is required to add a new license entity. After initial setup, License Entities can be edited but cannot be deleted.
- Name
- Street Address
- City
- State
- Zip Code
- Phone Number
- License Number (Note: this field cannot be edited later)
- FEIN number
Configure States
Overview:
These settings allow you to configure sales, alcohol tax options, and product eligibility by state.
Settings:
Navigate to the States tab.

State Eligibility & Compliance
Activate and configure states that your store should ship to

(Note: the example above is for illustrative use only, with values toggled on for visibility.
Your compliance settings may vary.)
- State – click on a State's name to edit the details for that State
- Active – set to Active to allow shipments to addresses in this state
- Sales Tax Type:
- Origin – sales tax rate based on the location the wine is being sold/shipped from
- Destination – sales tax rate based on the location where the wine is being shipped/sold to
- Override – set a custom tax rate and bypass the default tax table
- Tax on Shipping – apply tax to the shipping cost
- Apply Alcohol Tax – apply tax to alcohol
Note: packs (i.e. cases, bundles, multi-SKU products) will have their state-based compliance determined automatically based on the state eligibility of each bottle in the pack.
State Lists
State Lists are groups of states that you predefine to make product setup quicker and less error-prone than adding states one by one. State Lists determine where alcohol products can be sold and are key to enabling DRINKS to determine real-time compliance for each product and customer.

- Add State List – create a new State List
- Name – name your State List using a descriptive name. This is an internal value that customers will not see.
- Notes – we recommend adding notes to the State List to help recall the purpose of the State List in the future and for other employees. State Lists can be created for compliance, marketing, inventory, or any other purpose.
Configure Products
Overview:
These settings impact state product eligibility, compliance functionality, and reporting.
Settings:
Navigate to the Products Tab.

Important Concepts
- After installing DRINKS Assure, your store now has two product tabs. Shopify's native product tab acts as your primary product catalog. DRINKS' Products tab supplements Shopify information with alcohol-specific data that enables accurate tax calculation and compliance checks
- Products are automatically synchronized from Shopify to DRINKS Assure. Shopify remains your primary database for setting up new products.
- Each synchronized Shopify product must be identified as either a Wine, Beer, Spirits, General Merchandise, Subscription or Pack within DRINKS Assure – this distinction is important for accurate compliance. When you first set up DRINKS Assure, you'll need to fill out supplemental information for every alcohol product in your store (i.e. ABV, volume). Going forward, you will only need to add alcohol-specific data when you add new products.
- Packs (i.e. cases, bundles, multi-SKU products) are created in the DRINKS Assure Products tab. Once you create Packs in DRINKS Assure, tax, compliance, and state reports will be accurately processed based on which Wines are in the Pack.
- Wine
- Beer
- Spirits
- Pack
- Gen Mdse (i.e. apparel, coffee, etc..)
- Subscription - alcohol subscriptions
- Unassigned - all products not currently configured in the app. If these products are to be sold they need to be configured to ensure proper compliance checks and tax calculation.
- Ignored - any product that won't be sold in the store, can be set to "ignore" (i.e. archived products).

When a product is first synchronized, the Type column is blank. By clicking on the product's name, you will be prompted to select if it is a Wine, Beer, Spirits, Pack, General Merchandise or Subscription.
Wine
For Wine in your store, enter the following fields:
- Vintage – the year when the wine's grapes were harvested
- Color * – select the most accurate color from red, white, or rosé
- ML * – volume of wine within the product in milliliters
- ABV% * – Alcohol by Volume %
- Wholesale Price- the wholesale price for the bottle, if applicable.
- Brand * – name brand of the bottle. Type a new Brand or select one from the dropdown list
- Class * – select the most accurate classification from fortified, sparkling, or still
- License * – select which licensed entity is associated with this Wine
- State Lists – select State Lists that represent where this Wine can be shipped. Choosing more than one State List enables the sum of all states (for example, if State List 1 includes CA and CO and State List 2 includes NJ and NY, the Wine would be available in CA, CO, NJ, and NY)
* Required field

Beer/Spirits
For Beer or Spirits in your store, enter the following fields:
- License * – select which licensed entity is associated with this product
- ML * – volume of the product in milliliters
- ABV% * – Alcohol by Volume %
- Brand * – name brand of the bottle. Type a new Brand or select one from the dropdown list
- State Lists – select State Lists that represent where this product can be shipped. Choosing more than one State List enables the sum of all states (for example, if State List 1 includes CA and CO and State List 2 includes NJ and NY, the Wine would be available in CA, CO, NJ, and NY)
* Required field
Packs
Configuring Packs
For each Pack in your store, configure which products are in the pack.
- Product – Wine, Beer, Spirits or Gen Merch within the pack
- Quantity – number of instances of the product within the pack

Viewing Packs
To view the products within a Pack on the Products tab, click the arrow, and the products will be displayed below the Pack row in an "accordion style” listing:

Helpful Notes & Troubleshooting:
- Shopify also has a Products tab located at the far left of your screen. If you don't see the options above, double-check that you have the DRINKS Assure Products tab open, not the Shopify product tab.
- The Products table is very wide. You may need to make your browser full-screen or use the scrollbar at the bottom right of your screen to see all the columns.
Configure Compliance Rules
Overview:
These options allow you to set the specific compliance rules that your customers will be subject to on your site.
Settings:
Navigate to the Compliance Rules tab.

Configure State-Based Compliance:
The Compliance Rules tab initially shows a list of configurable Compliance Rules along with their status and the number of states where each rule is active.
There are three possible statuses:
- Active – all states/zip codes are active (default status)
- Partially Active – some states have been deactivated
- Off – all states have been deactivated

- Click on a Compliance Rule's name to edit the States to enforce that Compliance Rule
- By default, all states are active for each Compliance Rule, but states can be deactivated to reflect your winery's specific compliance model
Available Compliance Rules:
- State Specific Notifications – display State Specific Notifications (i.e. California Prop 65). If there are multiple notifications for a given state, all notifications will display when the state is active. Notifications can be added and re-ordered.

- Dry Zip Code Enforcement – you have the option to prevent checkout or hold the order, for orders containing zip codes where alcohol cannot be sold or shipped.

- Volume Limits Per Customer – the amount of alcohol that can be sold or shipped to a customer during a specified period (monthly, yearly, or fiscal year) as determined by each state. You have the option to prevent checkout or hold the order, when this limit is exceeded.

- Volume Limits Per Shipment – the amount of alcohol that can be sold or shipped to a customer in a single shipment as determined by each state. DRINKS Assure does not have visibility to how parcels will be shipped. A rule of thumb is that if your 3PL never ships more than 12 bottles per parcel, than this rule can be disregarded. You have the option to prevent checkout or hold the order, when this limit is exceeded.

- State Product Enforcements - the ability to override the list of states set up for a particular product. For example: you can deactivate Florida and customers will be able to purchase all products in Florida. You can decide if the user is unable to add a product to their cart, which is not configured to ship to their state. You also have the option to prevent checkout or hold the order, when a product isn't configured to be shipped to a state.

- Enforce Age Verification - Configurable 3rd party, state-approved, age verification solution at checkout. Age verification is configurable by state (turn it on or off) and is performed in real-time while the customer is traversing the checkout process. While this age verification tool is not required by all states, the tool can be utilized for all sales. You also have the option to prevent checkout or hold the order, when a user fails age verification.

Hold Orders
Overview:
This allows you to decide how to proceed with a held order - keep as held or release the order for fulfillment.
Settings:
Navigate to the Hold Orders tab.

Hold Orders
If you utilized the "hold order" option in one of the compliance rules, and an order failed a compliance rule, you will find that order in the Hold Orders page of DRINKS Assure. The Shopify Orders page will also indicate if an order is in "Hold" status in the Fulfillment column.
This page allows you to decide to either keep an order in hold (fulfillment) status or release it for fulfillment.
Simply click on the checkbox to the left of the order(s) and then click the "Release Order" button. You then have two choices:
- Ignore Compliance on the Order(s) - this will bypass another DRINKS Assure Compliance check.
- Generally used when you feel comfortable fulfilling an order, even though the DRINKS Assure Compliance check failed.
- Release and Retry the Order(s) - this will run the order through the DRINKS Assure Compliance check again.
- Generally used when additional info is added to the order or the order is modified to make it compliant.

Note: Releasing a held order from the Shopify Orders page will not release it from the DRINKS Hold Orders page
Step 2: Enable the DRINKS Assure Embeds
Overview
Setting up the various product, state, and compliance settings will help ensure compliance with your orders at the time of checkout. To add compliance functionality during your customer’s entire shopping experience, you’ll need to activate DRINKS Assure Compliance App Extensions.
There are two steps to accomplish this:
- Enable the App Embeds in your theme editor
- Add the appropriate changes to your theme files
Enable DRINKS Assure for Your Store
To include DRINKS Assure in your storefront, you must enable its App Embed within your theme:
- From your Admin page (YourSite.myshopify.com/admin), click on the Online Store tab, then navigate to the Customize button of your Current Theme
- From the Editor, click Theme Settings in the bottom left of your screen
- Select the App embeds tab, Locate DRINKS Assure, and toggle it ON
- Important: Click Save at the top right of your screen

3. Enable the Age modal and/or State Selector
- Use the "v" to open up the Drinks-Compliance app embed
- Click "Show Age Modal"
- Design the modal how you'd like (colors, font, etc)
- Populate the age modal with the messaging you'd like
- Click "Show State Selector"
- Click save once all your changes are complete


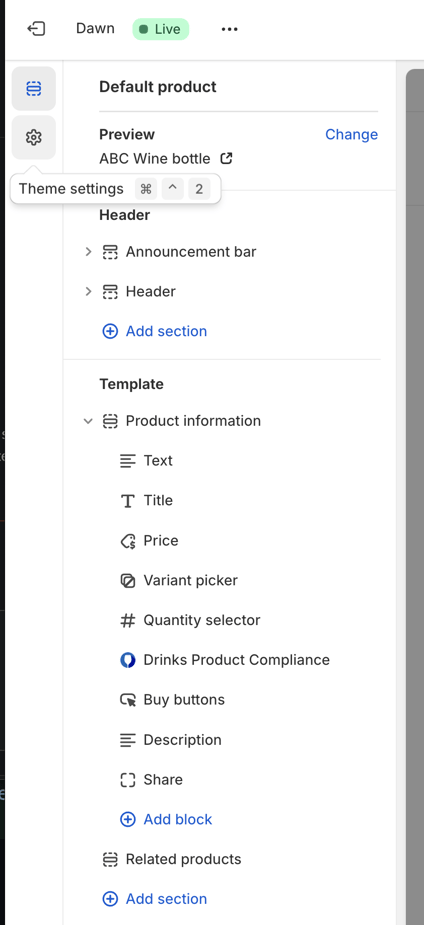
4. Product compliance on a Product Detail page - when the user has entered their State, it notifies the user if a product can't be shipped to their State.
- Navigate to "Products" in the top center of the page
- Click Add Block and add “Drinks Product Compliance” directly above the “Buy Buttons” app block.
- Save your changes (top right of the page).
Overview
Once you have enabled Shopify's Checkout Extensibility, it is important to add the DRINKS App Blocks for the DRINKS App to function properly in checkout.
- Customize your Shopify Theme
- Navigate to Checkout
- In the middle of the page use the dropdown to navigate to "Checkout and Customer Accounts"

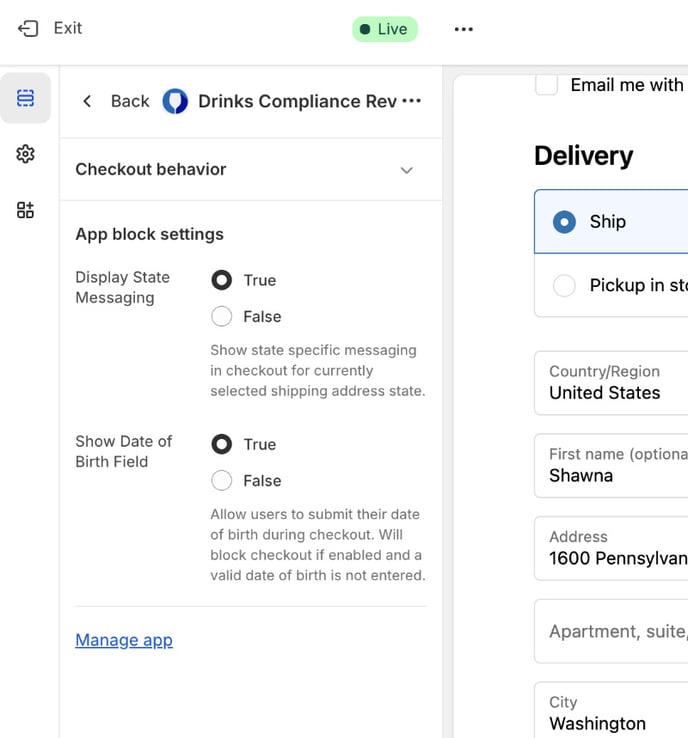
3. Add DRINKS App Blocks
- Click "Add App Block" to add the appropriate app blocks in checkout
- "DRINKS Compliance Review" - it is critical that this App Block is added, as it ensures that the DRINKS Compliance checks will fire. Add as follows:
- Click "Add App Block" again.
- Add below "Payment Type" in the Payment section
- If Date of Birth Age Verification is desired, set "Show Date of Birth Field" to true.
- Click into the DRINKS Compliance Review App Block and set State Messaging to "True", so that State Messaging/Disclosures will display.
- Click "Save" to save these changes
- "DRINKS Compliance Review" - it is critical that this App Block is added, as it ensures that the DRINKS Compliance checks will fire. Add as follows:


Step 4: Add DRINKS Compliance Features into Templates
Product Filtering
DRINKS can disable any element that pertains to a product that is not compliant for a shopper. Products will be filtered only if all variants are non-compliant.
Filtering Product Listings
To filter all products represented with Dawn's default product card, you would edit snippets/card-product.liquid and change
<div class="card-wrapper underline-links-hover">By adding these tags to it
data-product-id="" data-drinks-filterwhich will yield
<div class="card-wrapper underline-links-hover" data-product-id="" data-drinks-filter>Within that DOM element, place a new div:
<div data-drinks-filter-message></div>If you would like to style the messaging to something more appropriate for your storefront, add this snippet to your CSS file and edit accordingly.
div.drinks-filter-message {/* YOUR STYLES HERE */}
This will provide a non-blocking filter to the element – text showing that the product is unavailable, dimming the product image, and disabling the Add to Cart button.
Step 5: Enable DRINKS Tax Service
Overview
Developed in partnership with Shopify, DRINKS is integrated directly into Shopify checkout to provide real-time tax and compliance. To enable this functionality, your store must be configured to use the DRINKS tax service instead of Shopify’s default tax service.
Once you have installed the DRINKS Assure App, our tax service will be immediately available to you. This service can be toggled ON or OFF as needed within the App settings, as illustrated below:
DRINKS Assure Tax Service OFF

DRINKS Assure Tax Service ON

ShipCompliant Integration
DRINKS Assure merchants can now utilize the ShipCompliant integration for fulfillment and/or AutoFile:
- Fulfillment: DRINKS Assure will pass orders to ShipCompliant so that ShipCompliant can immediately pass those orders to your 3PL.
- Filing: DRINKS Assure will send orders to ShipCompliant, with tracking number, once the order is in a "Fulfilled" status in Shopify.
The integration is now live and ready for use in the latest version of DRINKS Assure for Shopify!